Showing posts with label Autel MaxiTPMS TS401. Show all posts

Wednesday, September 29, 2021

Program Aston Smarttire System Sensors by Autel TS401

 Question:

Can we clone the original (my car is an Aston Martin 2007) Smarttire system sensors with Autel? And the whole system is about $1500?. That's favorable to getting this done a couple times at a dealer, right?


Solution:

The Autel MaxiTPMS TS401 has the ability to program Autel MX universal sensors, which are around $20-$25. I've used the TS401 and the MX universal sensors on other cars and they worked without any problems.

I've not tried to program the MX universal sensors with the DB9 Smartire system yet; however, all indications seem that it's doable. Indications meaning -- I was able to pull the codes of the Smartire and the Autel site link I provided above seems to indicate that Smartire codes can be copied to the MX sensors. I've not done it yet -- mainly because my sensors are fine, but I'll likely experiment in the spring out of curiosity. I will, however, pull all the codes off the sensors and store them -- in case the sensor batteries die before i have a chance of testing it.

Related, the $1K+ MaxiSys MS906TS does an excellent job on reading the codes, resetting the service light,  program TPMS sensors like the TS401 etc. for a number of the higher end vehicles.


Below are instructions for programming a 433 MHz Autel MX sensor to support a Smartire system.


Relearn Procedure:

Please note:

If new ID is created for the this sensor, OE tool is needed to perform relearn.

With Autel tools, the only solution is to copy the OE Sensors' IDs, and no relearn needed.

There are two methods to copy the OE sensors' IDs.


Method 1:

1. Please perform a rapid tire deflation while pressing the trigger button on Autel tool to receive sensor data.

2. Then use the 'Copy By Activation' function to program Autel sensor.

3. Install the duplicated Autel sensor to the location corresponding to the OE sensor.


Method 2:

1. Uninstall the OE sensor, a series of numbers (173-1-1-XXXXXXX) are printed on its surface, among which XXXXXXX is the OE sensor's decimal ID.

2. Use the 'Manual Create' function to program Autel sensor.

3. Install the duplicated Autel sensor to the location corresponding to the OE sensor.


Note:

If necessary, please pay special attention to the sensor ID format conversion when using the 'Manual Create'.

I used method 2 and it worked perfectly. Went ahead and replaced all 4 SmarTire sensors. Saved a fortune.

Sunday, September 26, 2021

Mercedes 2012 E350 convertible TPMS Relearn with Autel

I changed the wheels on my new to me 2012 E350 convertible. I went with aftermarket wheels. During the process I decided to just go with a new set of TPMS sensors.
Immediately after driving the car away from the tire shop I noticed my TPMS was not working as I thought it would. Constant yellow tire light and “tire pressure system inoperative”.

TPMS I purchased was Autel MX-sensor from obdii365.com for about $120 (set of 4).

You’ll need to purchase a TPMS programmer, I got mine from Autel and it covers almost all sensors including OEM.

For reference TPMS out of the box are not programmed at all and need this In order for a vehicle to recognize it.

Here are the steps that worked with no problem.

1. Deflate tires completely flat.
2. Get your Autel MaxiTPMS TS401 and turn it on.
3. Find your make, model, year, sub model.
4. Press and hold Y
5. Select auto create
6. Press and hold Y again and go to the front right wheel, hold the device near the stem, and within seconds you’ll here a chime on the device meaning it’s been recognized.
7. Press and hold Y again and do the remaining 3 wheels.
8. Once you complete this process back out to where you original chose car.
9. Press and hold center button that looks like a wifi but symbol.
10. Machine promotes you which wheel to start with.
11. Again, once machine finds TPMS when held near stem the device chimes. Press and hold the symbol again and repeat until complete.
12. Once officially complete you’ll have a list of all 4 sensors you scanned and activated.
13. Re-Inflate tires.
14. Go for a ride. TPMS may still say inoperative. After driving for a few miles and nothing happens, pull over, turnoff car. Restart and drive again, tire light should start flashing and within minutes your pressures should appear on the screen.


Monday, July 10, 2017

How to Update Autel MaxiTPMS TS401 Software Online?

Quick guide to download and update Autel MaxiTPMS TS401 tpms diagnostic and service tool software online.

1. Download & Install MaxiLinkII Software


The TS401 is updated via the MaxiLinkII software (installed on a Windows PC) and by downloading the Update file from the Maxitpms.com website.
The Maxilink II software is available at http://www.maxitpms.com/tpmscms/product/580.jhtml. From the homepage, www.maxitpms.com, go to Products, then
select MaxiTPMS TS401, click on the Downloads tab and then click on Maxi PC Suite TS401 file to download the MaxiLinkII software. To unzip the file, right-
mouse click on the file and select Extract All. Double-click on Setup.exe to install.
update-autel-ts401-1

2. Download TS401 Update

To download software updates, click here, http://www.maxitpms.com/tpmscms/product/580.jhtml, then select TS401 Update file. Or from the homepage, www.maxitpms.com, click on Products, then MaxiTPMS TS401, and click the Downloads tab. In the list, click the TS401 Update file to download the zip file. To unzip the file, right-mouse click on the file and select Extract All. Remember to note the location of extracted folder.
update-autel-ts401-2

3. Connect Tool to PC


Connect tool to the computer using the supplied USB and select Update Mode on the tool.

Note: When an error occurs and the tool is unable to work properly, you may need to update the
programs. Power off the tool first and then hold the N button, connect the tool with the computer
via USB and then the tool will enter the Update Mode forcedly. Follow the update procedures to
refresh the program.
update-autel-ts401-3

4. Update the Tool


IMPORTANT: Both the Autel TS401 file and the DTC file must be updated for the tool to function correctly. There is NO need to register the tool before updating.

Launch MaxiLinkII on the PC and then select TS401 on the left-hand side of the screen under the TPMS tab. Under Update Program, click on Select File and browse to the software update you downloaded. Open the folder labelled US, select the file within (the file extension is .bin) and click on Update.

The application will communicate with the tool and update. The PC application and the tool will display a message once the update is completed. Next, under Update DTC, click on Select File, browse to file (the file extension is .aut) and click on Open, and then click on Update.

The application will communicate with the tool and update its software. The PC application and the tool will display a message once the update is completed.
Now your tool is ready to use!
update-autel-ts401-4
update-autel-ts401-5
http://www.obdii365.com/upload/pro/autel-maxitpms-ts401-quick-guide.pdf

http://www.obdii365.com/service/new-tpms-diagnostic-and-service-tool-maxitpms-ts401-version-v239-310.html

Wednesday, April 12, 2017

How to replace 99% US cars’ Tire Pressure Sensor with Autel MX-Sensor

Obdii365 has newly launched Autel MX-Sensor 433MHz/315MHz universal programmable TPMS sensor specially built for Tire Pressure Sensor replacement. MX-Sensor covers 99% of the US and Canadian vehicles. Here we carry out a subject about the MX-Sensor.

Project:
How-to: replace 99% US cars’ Tire Pressure Sensor with Autel MX-Sensor

Project Description:
Learn the installation procedure of Autel MX-Sensor Tire Pressure Monitoring System (TPMS) sensors Autel MaxiTPMS TS401
Skill Level:
Easy

Project vehicle:
99% US and Canadian vehicles (433MHz/315MHz)

Tools Needed:
Bead loosener
Screwdriver
TPMS sensors
Tire tool
autel-mx-sensor
Project Time:
1 hour or less

Project Cost:
Cost of TPM sensors. (Autel MX SENSOR:US$23.99)
autel-mx-sensor-replace
Install Sensors:
1) Loosening the tire
Remove the value cap and core and deflate the tire. Use the bead looserner to unseat the tire bead. Clean the valve stem hole with a Lint free cloth to ensure there is nothing that will compromise the seal between the valve stem the wheel. Also clean the back side of the wheel.
Loosening-the-tire

2) Dismount the tire
Clamp the tire onto the tire charger, and adjust the value at 1o’clock relative to the tire separation head. Insert the tire tool and lift the tire bead onto the mounting head to dismount the bead.
Dismount-the-tire
3) Dismount the sensor
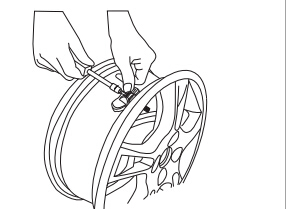
Remove the fastening screw and sensor from value stem with a screwdriver. Then loosen the nut and remove the value.
Dismount-the-sensor
4) Mounting sensor and value
Slide the value stem through the value hole of the rim. Tighten the screw-nut with 4.0 Nm with the help of the positioning pin. Assemble the sensor and value stem together by screw. Hold the sensor body against the rim and tighten the screw.
Mounting-sensor-and-value
5) Mounting the tire
Place the tire on the rim, making sure that the value faces the separation head at an angle of 180%. Mount the tire over the rim.
Mounting-the-tire
6) Matching TPMS sensor
The sensors are matched to the tire/wheel positions in the following order: driver side front tire, passenger side front tire, passenger side rear tire, and driver side rear tire using a TPMS diagnostic tool. See your dealer/retailer for service.